


Here is the method I use to bake our basic bread, three tins at a time. This is the bread we slice up and keep in our freezer for toast and sandwiches. I make two loaves of savoury/plain/grain bread and one loaf that is usually a fruit loaf, but sometimes something else, eg polenta and rosemary, or chilli and cheese.
Step 1: make the leaven and soak grain and fruit if needed

I start with just two tablespoons of my rye sourdough starter. It’s kept in the fridge, so I sometimes pull it out to come to room temperature the night before, sometimes not – it depends on timing of the dough and what the weather’s doing. The warmer the day, the warmer the mix = the quicker the ferment. If I want a longer ferment I’ll use the starter straight from the fridge and cold water.
To the 2T starter I add 150g water, mixing the starter to break it up. I then add 150g of flour – a mix of wholemeal and white usually, and mix it all together. Then I leave it for 4-15 hours depending on the temperature. This mixture is called a ‘sponge’, ‘leaven’ or ‘levain’ depending which recipe you’re looking at. This is enough leaven to raise 3kg bread.

At this time, if I’m not using spent grain, I’ll also soak 2 cups of grain and/or seeds (eg oat groats, barley, spelt grain, pumpkin, sunflower, linseeds) in boiling water.

Also if I’m using dried fruit in a fruit loaf I’ll soak a cup of sultanas, prunes, currants etc in boiling water, sometimes with tea, orange rind or juice, or spices like clove and cinnamon added.

Step 2 – mix the dough
When the leaven is risen and bubbly, it’s time to mix the dough.
Flour

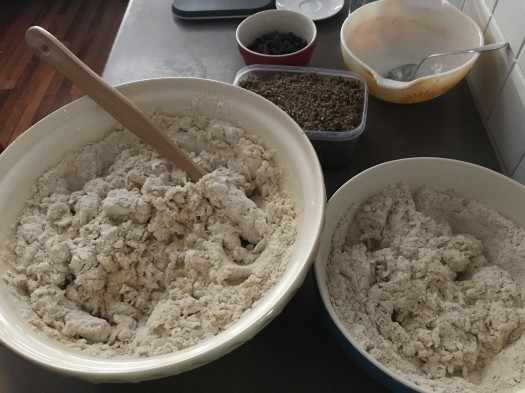
I weigh out 1750g of flour into my big bowl. I usually use about a 50-50 mix of wholemeal and white, but not always.
In my smaller bowl, I weigh out 750g flour, again usually 50-50 wholemeal/white.
Salt
I add 30g salt to the big bowl and 15g to the small bowl. I use local lake salt bought at the bulk store.
Leaven

I weigh out 100 g leaven and mix it with some water, and add it to the small bowl.
I mix the remaining 200g leaven with water, and add it to the large bowl.
Add-ins
I usually add the soaked grains / spent grain / soaked or fresh fruit / other ingredients now and mix through (but sometimes I’ll mix them in later, eg if the frozen spent grain hasn’t defrosted yet!)

Water
There is much discussion in fermenting circles about water, and whether the chlorine in tap water affects the sourdough microbes. We have an under-the-sink filter, and I use water from that. I add enough water to mix it to a rough dough.
Step 3: Bulk rise
After stretching and folding the dough a couple of times in the first hour, I then leave this mix alone, covered with a damp teatowel, usually overnight to rise and get bubbly.
Step 5: Rise again
I leave them in their tins, covered with a damp teatowel, for another few hours until they have risen to fill the tins.

Step 6: Bake
I preheat the oven to 250 degrees celcius, dropping it to 240 when I put the loaves in. After 10 minutes I drop the temperature again to 220-235 for another 20-30 minutes.
I know this is not precise, but I work better using my senses than specific measurements! Bread changes with the seasons and with the flour, and I am learning to go with that and trust my instincts. I can tell when the bread is cooked by the smell, by how it feels when I push down on it, and the sound it makes when I knock on the top of the loaf.

Step 7: Slice and eat or freeze

We eat pieces cut off the whole loaves for a few days, then slice the rest of the loaf and put in the freezer. This reduces the amount of bakes I need to do as the frozen slices make delicious toast.
We store the loaves in these cotton baby pillowcases that my mum sewed and embroidered over 40 years ago.

Wondering why I bother? Check out 12 reasons why I cook from scratch.
Are you a bread maker? What’s your process?
